2TIFF offers a wide range of advanced settings to customize your file conversion process. You can set custom filenames, adjust output file quality, reduce file sizes, skip specific files using masks, handle attachments, and more.
 If you are unsure about a specific setting, it is recommended to consult our support team before making any changes.
- Task processor
- Timeout
- Memory leaks limit
- Restart after jobs number
- Enable custom scripts
- Display progress bar for each file
- Raster image engine
- Rebex MHT to PDF engine
- Extract PDF attachments engine
- Extract email attachments engine
- Get file list from Excel file engine
- OCR engine
- Disabled helpers
- Kill hanging processes
- Use internal engines whenever possible
- Files and folders
- Page layout
- Attachments
- Document converting settings
- OCR
- Post processing
- Blank pages
- Output formats
- List of Documents settings
- File loading settings
- Log
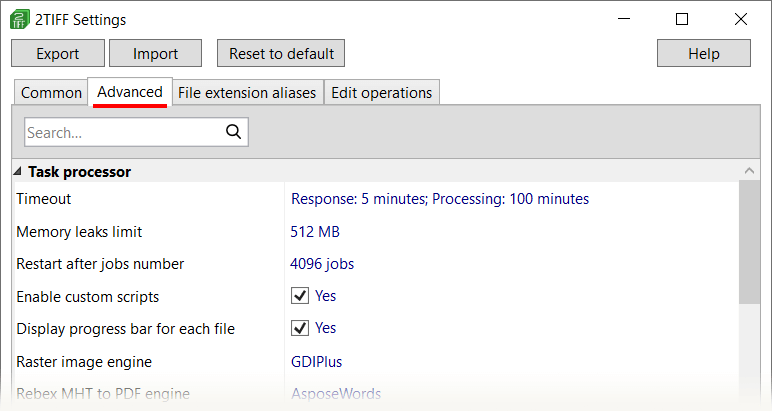
Task processor
Timeout
Default: Response timeout: 5 min; Task processing timeout: 100 min
Set a time limit for processing each individual file. Once this time limit is reached, 2TIFF will proceed to the next file. It is not recommended to modify this parameter unless you are certain or have received advice from our support service.
Memory leaks limit
Default: 512 MB
Set a limit on the random-access memory allocated for 2TIFF's work. If the amount of memory leaks exceeds a certain threshold, the program engine will automatically restart without any interruption. This allows 2TIFF to process any number of files per session without encountering any issues.
Restart after jobs number
Default: 4096 jobs
Automatically restart the program engine after a specific number of jobs.
Enable custom scripts
Default: Yes
Custom Python scripts can be used to modify the default behavior of the program. By default, these scripts are enabled. Disabling them will restore the program to its default state.
Display progress bar for each fil
Default: Yes
By default, the program shows the status of each file being processed. Disabling this setting may enhance performance when dealing with small files, but it will remove the progress bar indicators.
Raster image engine
Default: GDIPlus
Set a raster image engine. You can choose between GDIPlus and Graphic Processor. Please do not modify this parameter unless advised by our support service.
Rebex MHT to PDF engine
Default: AsposeWords
Select the main component for converting MHT to PDF. Please do not change this parameter unless instructed by our support service.
Extract PDF attachments engine
Default: PatagamesPdfium
Set the main component for extracting PDF attachment(s). You can choose between PatagamesPdfium, ABCPDF, and Acrobat. Do not modify this setting unless instructed by our customer service.
Extract from email attachments engine
Default: Rebex
Set the main component for extracting email attachment(s). You can choose between Rebex and Outlook. Do not modify this setting unless instructed by our customer service.
Get file list from Excel file engine
Default: AsposeCells
Choose the primary component when using an Excel file (XLS/XLSX/CSV) for loading a list of files to the program for further processing. Excel or AsposeCells can be selected. Only change this setting if advised by our customer service.
OCR engine
Default: TesseractOCR
Set the primary component for OCR processing. You can select Acrobat as an OCR component if you have Adobe Acrobat installed.
Disabled helpers
Default: Acrobat
Disable specific components that are used by the program to process certain types of files. It is not recommended to modify this parameter unless you are certain or have received advice from our support service.
Kill hanging processes
Default: Yes
The program may use the API of Microsoft Office applications during its operation. When this option is enabled, it will terminate background processes that were started by third-party software, such as Microsoft Word, Excel, and others, if they are no longer needed.
Use internal engines whenever possible
Default: No
Enabling this option will prompt the program to prioritize its internal (built-in) engines for file processing. If that is not possible, external components will be utilized.
Files and folders
Keep source files available for editing
Default: No
Enabling this setting will allow you to open and edit the source files while they are being processed by the program.
Temp folder
Default: %TEMP%
Change the folder where temporary files created by 2TIFF are located. By default, it is "C:\Users\[User]\AppData\Local\Temp".
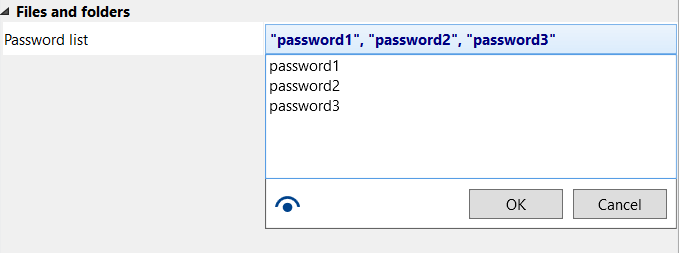
Password list
Default: none
Enter the password for the source file(s) to batch convert password-protected documents. If you have more than one file secured with passwords, input several passwords, each on a separate line.
Restore subfolders
Default: Yes
Keep the same subfolder structure as in the input folder (if a folder is specified as the source).
Recurse subfolders
Default: Disabled
Enable or disable subfolder recursion. When enabled, the program will process files from subdirectories as well. To exclude specific subdirectories, you can optionally enter their paths in the Exclude certain subfolders field.
Existing file action
Default: Create new file
Define what the program should do if the output folder already has a file with the same filename: Create new file, Overwrite, Skip.
Destination file password
Default: none
Enter a password to protect the converted files. The password protection will be applied to all successfully processed files.
Keep output files on any error
Default: Yes
Define the program's behavior when it encounters an error, such as when a watermark file is missing. If set to No, the program will not save files in the output folder if an error occurs.
Output filename template
Default: {*SrcFilename}{*WorksheetName}{*SrcFileMPageNo}.{*DstFileExt}
Modify the output file name template using macros and/or arbitrary text. The default output name is: {*SrcFilename}{*WorksheetName}{*SrcFileMPageNo}.{*DstFileExt}.
- {*srcfilename} – source file name;
- {*worksheetname} – worksheet file name (for Excel or CAD files);
- {*srcfilempageno} – source file page number ("M" stands for multiple pages, this macro does not add page number "1" to single-page files);
- {*dstfileext} – destination file extension.
Click the {=} icon to add other built-in macros, such as regular expression of source file name, date/time, source file's number of pages, and more.
You can combine macros with your own text, including spaces and dots. For example:
Item {*listitemno} {*srcfilename}.{*dstfileext} | Created: {*date(dd.mm.yyyy)}
Note: macro names are not case-sensitive. That means, both {*dstfileext} and {*DstFileExt} will work the same way.
Keep source files' original date/time
Default: No
With this option enabled, you can save the source files' properties and keep them in the converted files' properties: last write (last modified) time and date.
Exclude files by mask
Default: ~$*.*, *.db, desktop.ini
Exclude certain types of files that are not wanted for processing. To exclude files with a specific file extension, add them to the dropdown list, each on a separate line (after ~$*.*, *.db, and desktop.ini). File extensions should be added in the following format: *.[file extension]
Page layout
Rasterization resolution
Default: 300 dpi
Set the DPI (Dots Per Inch) to define the output image resolution. The resolution can be set within the range of 54 to 16384.
A DPI of 300 is suitable for standard quality, such as text documents. For high-quality images or photos, a DPI of 600 or higher is recommended. It is generally not recommended to set it lower than 300 (as the output file may have low quality) or higher than 1200 (as processing time may increase).
Use rasterization anti-aliasing
Default: Yes
Use a rasterization algorithm with anti-aliasing to improve the quality of the image. Anti-aliasing helps to smooth the edges of an image, making the transition more gradual and reducing the appearance of jagged pixels.
Attachments
Convert attachments
Default: Separate
Specify how the program should handle files with attachments, such as PDF Portfolios or Outlook email message files:
| Option | Effect |
|---|---|
| Ignore | Skip attachment(s) and convert only the main document |
| Separate | Save each attachment and the main document as separate files |
| Combine (attachments after main doc) | Convert the main document and append its attachment(s) after it |
| Convert attachments only | Skip the main document and process only attachment(s) |
| Combine (attachments before main doc) | Convert the main document and prepend its attachment(s) at the beginning |
Sort attachments
Default: Name
Select how file attachments should be sorted in the output folder:
- Unsorted
- Name
- Type
- Size
- Date
- Name descending
- Type descending
- Size descending
- Date descending
Attachments of unknown types action
Default: Ignore
Specify the action to take for unrecognized attachments. When this setting is set to Ignore, the program will skip file attachments if their format is not supported or cannot be recognized. You can change it to Replace with placeholder (refer to the next setting Attachments placeholder template to define its appearance) or Try to process.
Attachments placeholder template
Default: Filename
Configure placeholder(s) that should be inserted instead of unknown attachments (refer to the previous setting). Attachments will be replaced with a blank-page file with the original filename (Filename). You can choose your own file (Browse for file) or create a custom template (-Open Cover page designer-) as an alternative.
Include attachments by file mask
Default: *.*
Use an expression that allows converting only certain attachments by mask. For example, type *.pdf to convert PDF attachments only. Or enter attachment.* to convert only files containing the word "attachment" in the filename. You can add one or several masks at the same time (each on a separate line).
Exclude attachments by file mask
Default: none
Use an expression that restricts processing of certain attachments by mask. You can add one or several masks at the same time (each on a separate line). For example: *.docx
Document converting settings
Page range
Default: All pages
Set page range by selecting all pages or a specific page range.
To choose certain pages or a specific page range, type in the desired page numbers and/or ranges separated by commas. For example: 1,3,5-10,25. To select pages from the end of the document, use the syntax last (last1 for penultimate page, etc.). For example: last2,last1,last
Skip repeated pages
Default: No
This feature helps you avoid converting the same page multiple times. For example, if you specified overlapping page ranges.
Save metadata
Default: none
Save metadata from the source files such as EXIF, IPTC, XMP and keep it in the output files.
Save ICC profile
Default: No
Save the ICC color profile in the output file if it exists in the source image file.
Grayscale
Default: No
Set the color mode in the output file to grayscale (in shades of gray).
Convert engine(s)
Default: none
Enter the name(s) of the specific file conversion engines to change their priority. Do not modify this setting unless instructed by our customer service.
OCR
OCR languages
Default: none
This setting is used for OCR (Optical Character Recognition). Select the language or languages that are present in your source files. To achieve better results, only select the languages that are actually used in your source files.
Post processing
Successfully processed files
Default: None
Choose an action to perform on the successfully converted files:
- Copy to folder
- Move to folder
- Delete files
- None
Files that failed to process
Default: None
Select an action to be performed with files that failed to convert for some reason:
- Copy to folder
- Move to folder
- Delete files
- None
Blank pages
Remove blank pages
Default: No
Enable/disable automatic detection and removal of blank pages during processing. Sometimes documents may contain blank pages (usually at the end of a document). The program can detect such pages and remove them.
Min pixels quantity threshold
Default: 0.5%
Set the minimum number of pixels per page as a tolerance threshold to determine whether a page has colors other than white.
Min channels difference threshold
Default: 4%
Set the minimal difference of R, G, and B channels' values as a tolerance threshold to determine whether a page has colors other than white.
Output formats
TIFF
Multipage
Default: As in original file
Set the multipage option to control the structure of the output TIFF files:
- As in original file
- Split into single pages
- Merge into one file
The Split into single pages option creates a separate file for each page, regardless of whether the source files are multi-page or single-page. The Merge into one file option combines all files from the source into one multipage document.
If you choose the Merge into one file option, you can refer to the Combined file setting to specify the filename for the output TIFF file.
Page index to insert
Default: -1
When using Multipage: Merge into one file, the program adds new files to the end of an existing document. However, you can also add them to the beginning (0) or insert them somewhere in between the document (e.g., 5 – to place new files after page 5). The default value is "-1".
Combined file
Default: Combined.tif
Set filename of the resultant multipage output file when Multipage: Merge into one file option is used. Default name: "Combined.tif"
Other settings
The remaining settings in this section control the quality of output TIFF images:
- Pixel type (color space)
- Flate compression level
- Quantize colors
- Quantize quality
- Alpha threshold
- Quantize alpha channel
- Create thumbnail
- Dithering
- Write creator string
- Horizontal resolution ("-1" stands for the default value)
- Vertical resolution ("-1" stands for the default value)
- Keep the color space of the original image as it is (if possible)
- Compression
- JPEG quality
- JPEG sampling
- Fill order
- Photometric mono
- T4 options
- Is big TIFF
- Little-endian
- Tiled
- Multi strip
- Use LZW/Flate predictor
List of Documents settings
Unique content in file list
Default: No
To enable adding the same file to the processing queue multiple times for conversion, you can change the default setting for unique content. By default, unique content is disabled. If you want to add the same file only once, change the setting to Yes.
File loading settings
The File loading settings section includes settings that control pre-processing, specifically what 2TIFF does with the source files before converting them.
CAD
Worksheet name
Default: *all*
Define which worksheets should be processed. You can set it to:
- *all* – convert all worksheets contained in a file
- *default* – convert the default (active) worksheet only
- My worksheet 1 – use the actual worksheet name to specify which sheets to convert
Split worksheets
Default: No
Check this option to split multi-sheet CAD drawings into separate worksheets. As a result, each worksheet will be saved as a separate file.
"Model view" tab processing
Default: No
Check whether you want to ignore the "Model view" tab, process only the "Model view" tab, or process all worksheet tabs.
Disable "Not to Plot" layers
Default: No
Some layers have the "Plot" property turned off. However, by default, the program will process them like any other layer. Enable this option to ignore layers marked as "Not to plot".
Fonts to bold
Default: No
Try making fonts bold to make the text look thicker.
Default line weight
Default: -1
Change how the lines should look on a processed CAD drawing. You can make them thinner or thicker by changing this value.
Display line weight
Default: As in document
- "Yes" means that the program uses line weights as in DWG or DXF drawing it processes;
- "No" means that the program uses the same standard thickness without applying any special size;
- "As in document" means that the program gets the line weight value from the DWG or DXF file header.
Paper size limit
Default: A3
Set the maximum paper format (page size) for CAD drawings. You can select either a Standard or Custom page size in millimeters, centimeters, or inches.
Try to use SHX fonts
Default: Yes
Use SHX fonts if they are contained in your drawings. Consider adding them if the text is too thin or hard to read. Set a path to a folder with SHX fonts if you have them (see the setting "SHX font folders").
Grayscale
Default: No
Make CAD drawings grayscale (in shades of gray).
SHX font folders
Default: none
Browse for folder(s) where SHX fonts are located, so that the program can use them. Use together with Try to use SHX fonts: Yes.
Page margins
Default: 0, 0, 0, 0
Specify custom page margins for CAD drawings, in points: left, right, top, and bottom margin.
Email message
Page size
Default: *all*
Set page size for email files, such as EML, MSG, OST, PST, P7M. You can select:
- Default – use the standard local paper size based on your computer's system locale; e.g., A4 in Europe and Letter in the U.S.;
- Standard – select a pre-defined format;
- Custom – set any width x height in millimeters, centimeters, or inches.
Page margins
Default: 20,20,20,20
Specify custom page margins for email message files, in points: left, right, top, and bottom margin.
Keep message header
Default: Yes
When processing email message files (EML, MSG), you can choose whether to keep or disable the email header in the output files.
HTML
Code page
Default: Default
Select character encoding for HTML files, e.g., Unicode or ASCII.
Page size
Default: Default
Set page size for HTML files. Available options:
- Default – use the standard local paper size based on your computer's system locale; e.g., A4 in Europe and Letter in the U.S.;
- Standard – select a pre-defined format;
- Custom – set any width x height in millimeters, centimeters, or inches.
Page margins
Default: 0, 0, 0, 0
Specify custom page margins for HTML files, in points.
Zoom level
Default: 0
Scale up or down the size of HTML pages, in percent.
Auto fit X
Default: Shrink to fit
Set scaling by X-axis: None, Shink to fit, Scale to fit.
Auto fit Y
Default: None
Set scaling by Y-axis: None, Shink to fit, Scale to fit.
Allow proprietary media formats
Default: Yes
HTML files may contain multimedia files, such as videos, embedded within them. This setting enables the display of these files, allowing to show previews of videos. Disabling this setting may improve processing speed.
Raster images
Color profile action
Default: Apply embedded profile
Define what to do if the source image has an embedded or if you have an external color profile for it. By using the image's embedded or external color profile, you can achieve more accurate printing with the reproduction of actual colors. Here are the possible options:
- Ignore — do not use profiles, any color profile is ignored
- Apply embedded profile — use image's embedded color profile (if it exists)
- Apply external profile — use an ICC profile that can be specified via the ICC profile filepath setting
- Apply embedded profile (if it is not RGB) — use image's embedded profile if it's not RGB (may increase processing speed)
ICC profile filepath
Default: None
Set path to an ICC file containing an external color profile. Use together with Color profile action: Apply external profile (see previous setting).
Draw annotations
Default: Yes
Show or hide annotations and pop-up comments in PDF files. By default, they are displayed.
Portfolio files pre-sorting
Default: Unsorted
Enable sorting By index for PDF Portfolio attachments.
Image to PDF embedding
Load image as JPEG
Default: No
When the program converts images (any image type except for JPEG), you have the option to set the image loading as JPEG. This usually reduces the output file size, resulting in faster processing speed.
JPEG quality
Default: 75%
Set JPEG image quality within 25-100% when the Load image as JPEG setting is enabled.
TEXT
Code page
Default: Default
Select character encoding for plain text files, e.g., Unicode or ASCII.
Font
Default: "Consolas" 11
Set font style, size, and character set.
Line spacing
Default: 0.15
Define a custom spacing between lines of text, in points.
Paper size
Default: A4
Select paper size (page format), e.g., A4 or Legal.
- Standard – select a pre-defined format;
- Custom – set any width x height in millimeters, centimeters, or inches.
Page margins
Default: 10, 8, 10, 8
Specify custom page margins for text files, in points: left, right, top, and bottom margin.
Word
Update fields
Default: No
Automatically update dynamic fields in Microsoft Word files (e.g. [Date], [Time], [Name]). As a result, the up-to-date values of Microsoft Word's built-in dynamic fields will be displayed in the output documents after processing.
Hide revisions
Default: No
Enable this setting to process Word documents with hidden revision marks (e.g., inserted and deleted text, formatting changes, moved paragraphs).
Skip comments
Default: No
Enable this setting to disable Word document's comments if they were made inside a document.
Markup mode
Default: As is
Select Markup mode and which revisions should be kept:
- Balloon revisions
- Inline revisions
- Mixed revisions
- As is
Keep bookmarks
Default: In-text bookmarks
Select bookmarks which should be displayed on a processed document:
- Without bookmarks
- Heading bookmarks
- In-text bookmarks
Enable macros
Default: No
Enable or disable macros when converting a macro-enabled Word document.
Downscale shapes to page size
Default: No
Shrink large embedded images in Outlook EML, MSG, and Word files if they exceed the page size.
Mail merge
Default: No
Enable the mail merge feature if you're converting a Word file with embedded data from an Excel file (if you have a Word document with data from Excel) (Mail merge data source). Use this setting together with:
- Settings → Advanced → File loading settings → Word → Update fields:Yes;
- Settings → Print engine → AsposeWords engine selected for DOC, DOCX;
- Specified path to an Excel file for Mail merge data source (see the next setting).
Mail merge data source
Default: none
Set an Excel file as a source for mail merge data for the Mail merge function.
PCL
Lines per page
Default: -1
Set the number of lines per page. "-1" stands for the default value.
Detect .PLT file dimension
Default: Yes
Detects PLT file format which is a vector-based plotter file that contains information for a certain CAD file.
ZPL
Dpmm
Default: 8
Set print density for ZPL files. We recommend choosing one of the following values:
- 6 dpmm (152 DPI);
- 8 dpmm (203 DPI);
- 12 dpmm (300 DPI);
- 24 dpmm (600 DPI).
Width
Default: 4
Set width for ZPL files, in inches.
Height
Default: 6
Set height for ZPL files, in inches.
Proxy host
Default: none
Configure ZPL proxy host settings. You can change it to the needed value.
Proxy port
Default: 0
Configure ZPL proxy port settings. You can change it to the needed value.
Max labels per request
Default: 30
Configure the maximum number of labels per request. You can set any number as needed.
Log
Verbosity
Default: Verbose
Select the type of log created by the program. You can select between Verbose, Regular, Laconic, and Trace.
Create new log file after
Default: File size limit exceeds
Choose when a new log file should be created (and the previous log file replaced). You can select between File size limit exceeds and Every day.
File size limit
Default: 16 MB
Set a limit for the size of a log file.
Keep log history
Default: 32 file(s)
Set the number of files that keep the log history.
Log file folder
Default: %TEMP%
Set path to a folder for log files. By default, it is C:\Users\[User]\AppData\Local\Temp