2TIFF is a command line utility for saving documents and image files as TIFF images in batch mode. It is a reliable software for batch image conversion and editing, easily operated from the command line. You can easily convert any number of documents or images to TIFF, and apply additional parameters, e.g., setting custom resolution or creating a multipage TIFF.

Besides batch conversion, 2TIFF provides various image processing options, such as basic photo correction methods, adding a watermark or image editing (resize, rotate, flip, crop, sharpen, compress, grayscale, and more).
Advantages
Command Line TIFF Converter
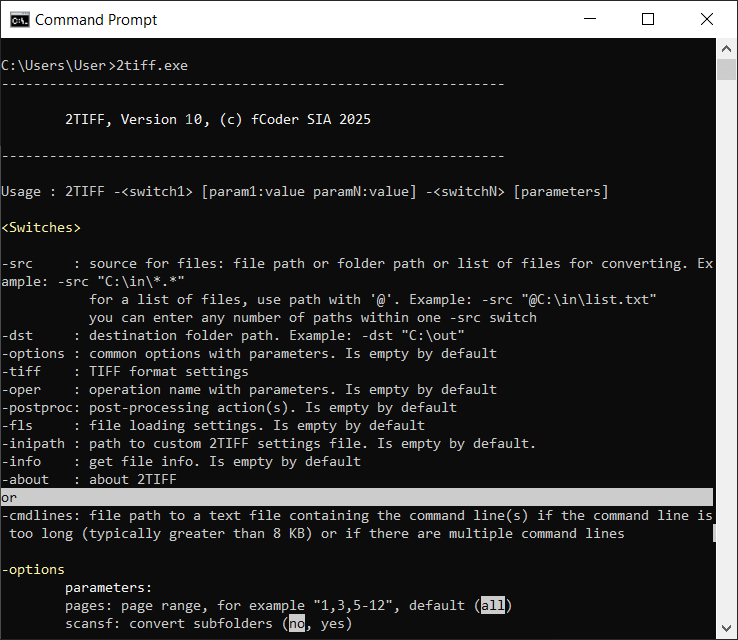
Power users, developers, and system administrators, or just anyone familiar with Command Prompt (cmd.exe) can utilize this tool to fully automate saving documents to the TIFF format. Since 2TIFF has no graphic interface, the application is highly efficient, fast, and reliable. 2TIFF can work nonstop 24/7 without any freezes or interruptions. 2TIFF can be used as a standalone tool, called from another software, or through scripts. The utility is easy to use, and all the commands are described in the syntax.
![]() See 2TIFF syntax with examples
See 2TIFF syntax with examples
110+ Supported Formats
2TIFF can batch convert a wide variety of office documents, images, texts, drawings, worksheets, presentations, emails, invoices, RAW digital photos, and many other file types, including:
- Microsoft Word, OpenOffice (RTF, DOC, DOCX)
- Non-TIFF images (JPEG, PNG, BMP, GIF, HEIC (HEIF), SVG)
- Adobe Reader or Acrobat documents (PDF)
- Microsoft PowerPoint presentations (PPT, PPTX)
- Autodesk AutoCAD drawings (DWG, DXF)
- Microsoft Excel spreadsheets (XLS, XLSX)
- Email message files (EML, MSG, EMLX, PST)
- Adobe Photoshop files (PSD)
- Microsoft Visio files (VSD)
- Plain text files (TXT)
- And more
The program uses an internal graphic engine to convert most of the supported file types – no additional software is usually required. For certain types of documents, however, 2TIFF uses a public API of third party software. You'll find more information on the supported formats page.
![]() See the full list of supported file types
See the full list of supported file types
Advanced Settings

Open the 2TIFF Settings editor to change the program's default settings. These are the defaults of 2TIFF that can be modified via 2tiff.exe -ini command. We recommend changing them with caution and contact us for help in advance.
Smart Processing Core
2TIFF selects the most effective way to process documents or images, depending on the file format, file structure, and other parameters. It analyzes files' contents and processes them with optimal settings (and time costs), whether it is a plain text file, PDF, CAD drawing, Excel chart, etc.
Main Features

Resize, rotate and auto-rotate output files
Set image scaling and rotation in advance! Operations autorotate and rotate let you automatically or manually turn pages. You can set page orientation (portrait/landscape) and rotation direction (clockwise or counterclockwise). Also, you can make output images smaller or larger using resize operation. While resizing or rotating, 2TIFF keeps the original proportions of the source files.
Example:
2tiff.exe -src "C:\In\*.*" -dst "C:\Out" -oper autorotate orientation:portrait resize size:"500 500"

Merge various files into multipage TIFF files
Using -tiff multipage:, you can combine different files in different formats into a multipage TIFF image. This way, you can also create large documents by adding new pages to an existing TIFF. Merge files in different ways: append (add to the end), prepend (add to the beginning), or keep them "as is". You can also split documents into pages as separate TIFF images.
Example:
2tiff.exe -src "C:\In\*.*" -dst "C:\Out" -tiff multipage:append combine:"output.tif"

Watermark images and documents
You may add a text watermark, using the desired words and a range of parameters: font style, bold, italic, underline, color, direction, adding a border, blending mode, and alignment. You can change the size, angle, and position for both image and text watermark types.
Example:
2tiff.exe -src "C:\In\*.*" -dst "C:\Out" -oper textwatermark text:"DRAFT" angle:45 halign:center italic:yes fontsize:24
Compress output TIFFs and adjust the level of compression
Save files in minimum size if needed and reduce the size of output TIFF files. You can select the type of compression (rle, fax3, fax4, lzw, flate, jpego, jbig, jpeg, packbits) and adjust the level/quality of compression as well as other related parameters.
Example:
2tiff.exe -src "C:\In\*.*" -dst "C:\Out" -tiff compression:jpeg jpeg_quality:100

Batch convert password-protected Word and PDF files
Enter one or even several passwords to let 2TIFF unlock and batch convert password-protected documents (Word or PDF) to the TIFF format. This way, you can also process password-protected RAR or ZIP archives.
Example:
2tiff.exe -src "C:\In\*.*" -dst "C:\Out" -options srcpwd:"Password 1" srcpwd:"Password 2" srcpwd:"Password 3"

Add QR codes and other types of barcodes
2TIFF can automatically add a user-specified Barcode watermark to all or selected output PDF pages. Add QR Code, Code 128, Code 39, UPC-A, or other barcode types. For each barcode, you can adjust size, position, alignment, offset, page range, and other parameters. You can either enter values from a barcode generator or type any text that you wish to convert into a QR code.
This feature can be accessed from 2TIFF Settings: 2tiff.exe -ini → Edit operations → Barcode watermark.

Crop or resize output images
2TIFF offers several ways to crop a document. You can manually set the size of page margins for removal. Alternatively, you can specify a rectangle in the center of the page to keep while trimming everything else. The third option is automatic cropping (-oper crop method:autocrop), which removes margins based on color detection. With automatic cropping, you can adjust parameters like color sample and tolerance value.

Remove blank pages automatically
2TIFF allows you to automatically remove blank pages before conversion to PDF (using the -oper removeblankpages parameter) if they aren't needed. You can also customize the detection of blank pages by adjusting page range, pixel threshold, and channel threshold settings.

Embed ICC color profile when processing images
To maintain the most accurate color representation for your image files, you can include the path to your ICC profile (-fls iccprofile), which will be applied during processing.

Add a rectangular frame to output TIFF images
2TIFF features a paint function that allows you to draw rectangles over output TIFF images. You can use either a "pen" or "brush" (controlled by pen_color and brush_color parameters) to create outlines or filled areas. This capability is particularly useful when you need to hide specific parts of a document or add a contour to the inner border of each page. The rectangle is fully customizable — you can adjust its position, size, and color.

Run several commands sequentially
The -cmdlines switch allows 2TIFF to execute multiple commands consecutively. To use this feature, simply create a TXT file with your desired commands, placing each command on a separate line.
What You Can Do with 2TIFF
Set up the processing of files with attachments
Adjust processing of attachments via the attachments parameter. You can control how they are processed: converted separately, combined with the main document, or ignored. This works for files containing attachments, such as PDFs or Outlook MSG and EML files.
Run commands from PowerShell or another CLI
You can run 2TIFF commands and scripts from any command line interface. For instance, you can use Windows PowerShell, including Windows PowerShell 5, 6, and 7 or cmd.exe (Command Prompt) – 2TIFF works well anywhere. Thus, 2TIFF can be easily integrated into the document workflow system of an office.
Automate conversion via BAT, PS1, VBS, or CMD scripts
Thanks to the command-line interface, you can create your own batch files to automate document conversion. Create simple batch files (BAT), Command Prompt (CMD), PowerShell (PS1), or Visual Basic scripts (VBS) and schedule their execution via the Task Scheduler. Adding these scripts to Windows Task Scheduler will allow converting files from a selected folder at a specific time.
Use image editing features: cropping, contrast, gamma, brightness, autolevels and more
2TIFF has a variety of image editing features. The pictures can be converted to grayscale, cropped or edited by adjusting the sharpen filter, applying auto levels, contrast, gamma, brightness, or smoothing noise. Rotate them to a custom angle, in the desired direction, and set the background color. You'll find each feature described in detail on our syntax page.
Set rasterization resolution when converting vector documents
For processing vector documents to TIFF (e.g., PDF, Word DOCX), you can define rasterization resolution from a range between 72 and 4096 DPI. In addition, you can adjust horizontal and vertical resolution values manually, for example: -tiff vres:300 hres:300
Use silent conversion mode
Once everything is tested and works the way you need, you can set up silent conversion. This will make the whole process seamless and uninterrupted. By toggling parameters alerts and silent, you can disable any dialog prompts or alert windows that might appear.
Convert all files listed in a plain text file
You can convert all files from a list. To do it, you'll need to have their file paths listed in a TXT file. When specifying a source (-src), use the @ symbol at the beginning of the path when entering a command. Indicate a list of files like this: -src "@C:\List\files.txt"
Set multiple sources for files
Convert files from one or multiple sources at the same time! Within one command, you can indicate a source where files are located: path to a file, path to a folder, or a list of files. Folders and lists can be mixed. For example: -src "C:\In\*.*" "E:\Files\*.pdf" "@C:\Lists\list.txt"
Set post-processing for converted files
With 2TIFF, you can automatically delete, copy, or move files to another location after file conversion is finished. This feature can be configured for both failed and successfully converted files.
See currently installed 2TIFF version and build date
Keep your 2TIFF command line software up-to-date and don't miss new releases! To find the build release date of your 2TIFF version and your license key, run this command: 2tiff.exe -about. Please include this information when contacting us, so that we help you faster.
Get page count as return code
Find out the number of pages of a specific document – by receiving the executable's return code. You'll get the code back by entering the command: -src "C:\In\text.pdf" -info pagecount
Q&A
How to convert files using the default settings?
- Download and install 2TIFF;
- Use Win+R hotkey or click the Start button on the bottom-left corner of your Windows Desktop;
- Type cmd to open the Command Prompt and press Enter;
- Enter the command line:
2tiff.exe -src "C:\In\*.*" -dst "C:\Out" - Press Enter;
- For more examples, please see the complete description of 2TIFF syntax.
How to start 2TIFF from VB Script?
- Open Notepad;
- Enter Visual Basic Script code like this:
Set objShell = WScript.CreateObject("WScript.Shell")
objShell.Run """2tiff.exe"" -src ""C:\In\*.*"" -dst ""C:\Out""", 1, True
Set objShell = Nothing - Save this document as a Unicode text file. For example: Test.txt
- Rename Test.txt file to Test.vbs
- Double-click the Test.vbs file to start converting.
How to install 2TIFF silently?
Download the distributive file and save it on your hard drive. Run one of the command lines below.
To silently install the free version of 2TIFF:
To silently install the commercial version of 2TIFF (using a serial number):
Looking for a specific feature?
We continuously improve our command line utilities and other software products thanks to your feedback and suggestions. Please send us your feature requests, any thoughts, or ask questions via the contact page.